Replacement Method and Guidance
Time:2023-10-26 Views:994
1.
Loosen bolts of the tire, and support the appointed part to lift the
automobile body; (you’d better use screw jack or other safety equipment)
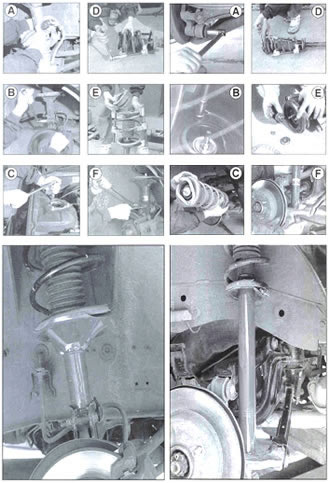
2. Remove the tire, and remove the braking tube, ABS wire harness,
stabilizing rod ring, etc. which are connected to the shock absorber;
(left photo A)
3. Gently support the steering knuckle (transmission shaft) by a jack,
and loosen the fixing nuts of the lower bracket (or lower lifting lug)
of the shock absorber; (left photo B and right photo A)
4. Remove nuts of the upper fixing holder; (left photo C and right photo B)
5. Lower the jack supporting the steering knuckle by several
millimeters, lift up the spring tensioner by hands, and remove the nuts
fixing the lower bracket, so that the spring tensioner is separated from
the steering knuckle; (be careful of the damage to the braking tube or
sheath of the transmission shaft when the steering knuckle is tilted)
6. Move down the spring tensioner, remove the nuts of the upper fixing
holder from the automobile body, and finally remove the spring tensioner
from the automobile; (right photo C)
7. Remove the bearing cover from the center of the fixing holder, and
loosen the nuts fixing the upper spring holder by SST (special tools);
(1. Do not use electric or other mechanical wrenches; and 2. Prevent
over loosening of the nuts so as to avoid the falling-off of the nuts)
8. Compress the spring by a spring compressor, and remove the upper
fixing nuts after you confirm that the gap between the spring and the
spring tray is big enough; (make sure the spring compressor and the
spring are stably contacted and the spring is evenly compressed) (left
photo D and right photo D)
9. make sure the upper fixing holder, spring tray, cushions, shock
insulation blocks, etc. are removed in the right direction, and replace
the shock absorber;(left photo E and right photo E)
10. Make sure the milling direction of the end part of the piston rod
of the shock absorber is matched with holes of the upper spring holder,
etc., install the parts in a reverse sequence of 1 to 10. (※ Please use
new upper fixing nuts)
The operational sequence and method mentioned above are only an
example; please find the best sequence and method according to the
automobile model and the type of the shock absorber.
Before replacement and during the replacing operation, you’d better refer to product instructions and automobile instructions.
In order to avoid falling off of the shock absorber and other
assemblies during the replacing operation, please make full preparation
for it before operation.


